FlexWrap your mind around webforJ's FlexLayout

One of the great benefits of creating web apps is gaining access to the powerful styling and layout capabilities of CSS. In particular, CSS lets you create responsive layouts, allowing your apps to smoothly adjust their layout according to parameters like window size and device type. Apps with responsive layouts look and feel better, and they allow users to use your app in their preferred context and size. With webforJ, you have that power in Java!
But, knowing what to do with that power is another story.
Perhaps you're used to carefully laying out forms with a rigid structure, and the prospect of creating designs that are adaptable and dynamic seems intimidating and complicated.
So where do you start?
With webforJ's FlexLayout!
FlexLayout fundamentals
The FlexLayout component is a powerful layout tool based on CSS Flexbox.
It can create responsive layout designs that adapt to the available space and number of elements in a natural way.
FlexLayout shares its terminology and conceptual structure with Flexbox, so if you're a seasoned CSS pro, your existing knowledge will apply just as well in webforJ.
Translating from Flexbox to FlexLayout
So, if webforJ's FlexLayout provides the same functionality as CSS Flexbox, how does one translate to the other?
If you've used Flexbox before, FlexLayout will be a familiar tool with different syntax.
Instead of writing CSS like justify-content: space-between; you will use object methods and enums to write Java code such as layout.SetJustifyContent(FlexJustifyContent.BETWEEN);.
| Function | CSS Flexbox | webforJ FlexLayout |
|---|---|---|
| Flex Container | An HTML element with the display attribute set to flex. | A FlexLayout component, created with the FlexLayoutBuilder. |
| Flex Items | Child elements of the container are items in the container. | Add components with the add(component) method, or create the FlexLayout with a list of components to include. |
| Properties and Values | Set CSS properties such as | Use FlexLayout methods such as |
| Code Example | | |
Creating a FlexLayout
To create a FlexLayout, use the FlexLayout.create() method to create a FlexLayoutBuilder, and use the build() method to build it:
FlexLayout flex = FlexLayout.create().build();
When creating a FlexLayout, you can set some properties right away with methods like wrap(), horizontal(), vertical(), and more.
See the
FlexLayoutBuilder
Javadocs for a full list of methods.
Populating your FlexLayout
To add a component to a FlexLayout, just use the add() method:
flex.add(new Button("A button in a FlexLayout"));
You can also add all the components right away when you create the FlexLayout by supplying a list of components in the constructor.
FlexLayout container cheatsheet
Configuration is where the real power of FlexLayout shines, because different configurations will yield very different behavior.
It can sometimes be difficult to wrap your head around the various configuration options, so visual cheatsheets are an invaluable resource.
Luckily, that's exactly what we have here!
When configuring a FlexLayout, you can set properties on the FlexLayout itself (the container) or on the individual items within it.
This post focuses on configuring the FlexLayout container.
A FlexLayout has a main axis and a cross axis, and you can configure them independently.
The main axis
The main axis is the primary axis on which the items in a FlexLayout appear, and can be either horizontal (row) or vertical (column), depending on the direction setting.
You can configure the main axis direction, wrapping, and item positioning.
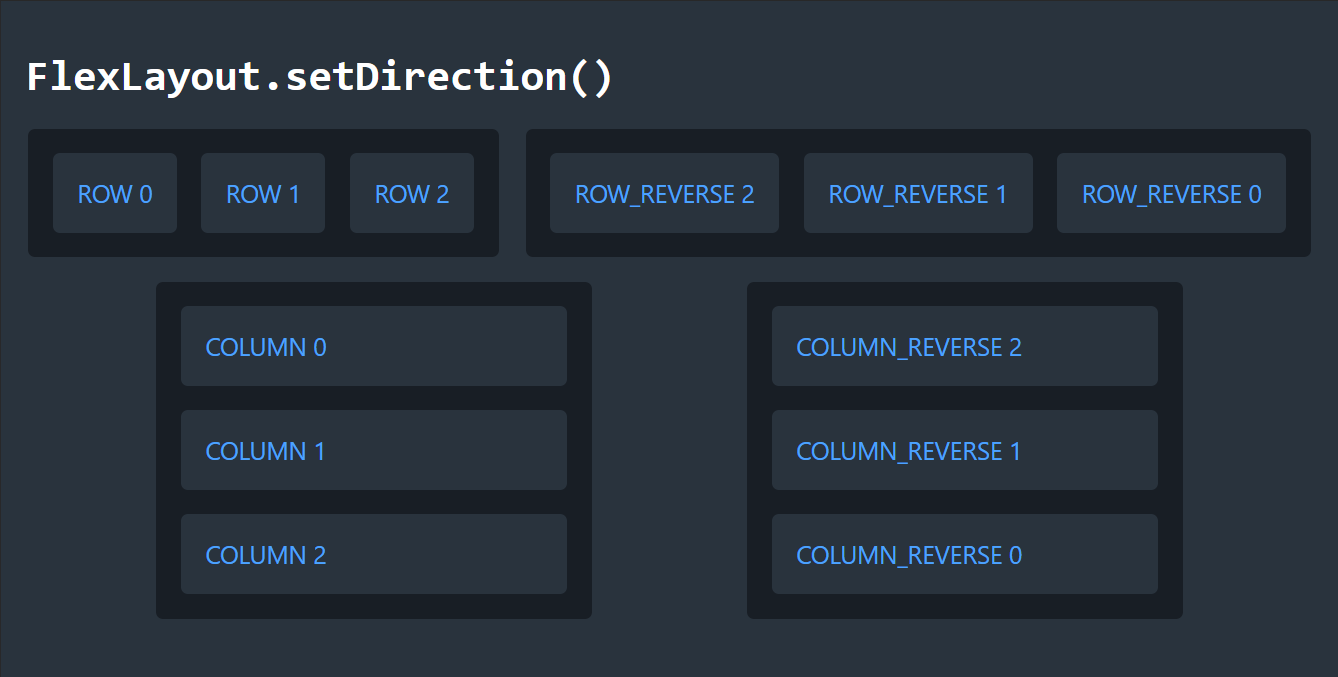
Direction with setDirection()
You can control the direction of the main axis with setDirection(), which corresponds to the CSS property flex-direction.
The image below shows the four possible values of the FlexDirection enum.
Each series of boxes is a FlexLayout, and the number corresponds to the order the element was added.
For ROW and COLUMN, the items appear in order from left to right or top to bottom, but for ROW_REVERSE and COLUMN_REVERSE, they are reversed:
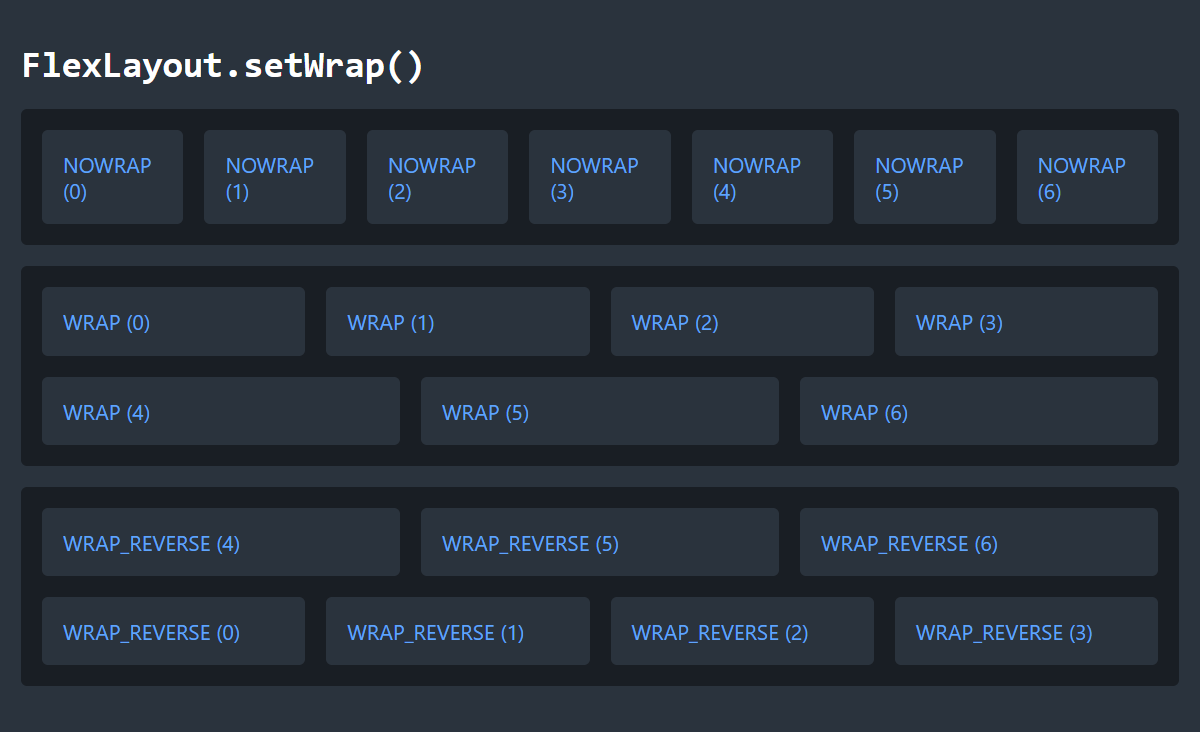
Wrapping with setWrap()
Wrapping content is one of the greatest benefits of the FlexLayout.
With wrapping enabled, content that doesn't fit in a single line moves to the next line in the direction of the cross axis, so your layout can adapt to different screen sizes.
You can configure wrapping with the setWrap() method, which corresponds to the CSS property flex-wrap.
By default, wrapping is disabled.
The image below shows the three possible values of the FlexWrap enum.
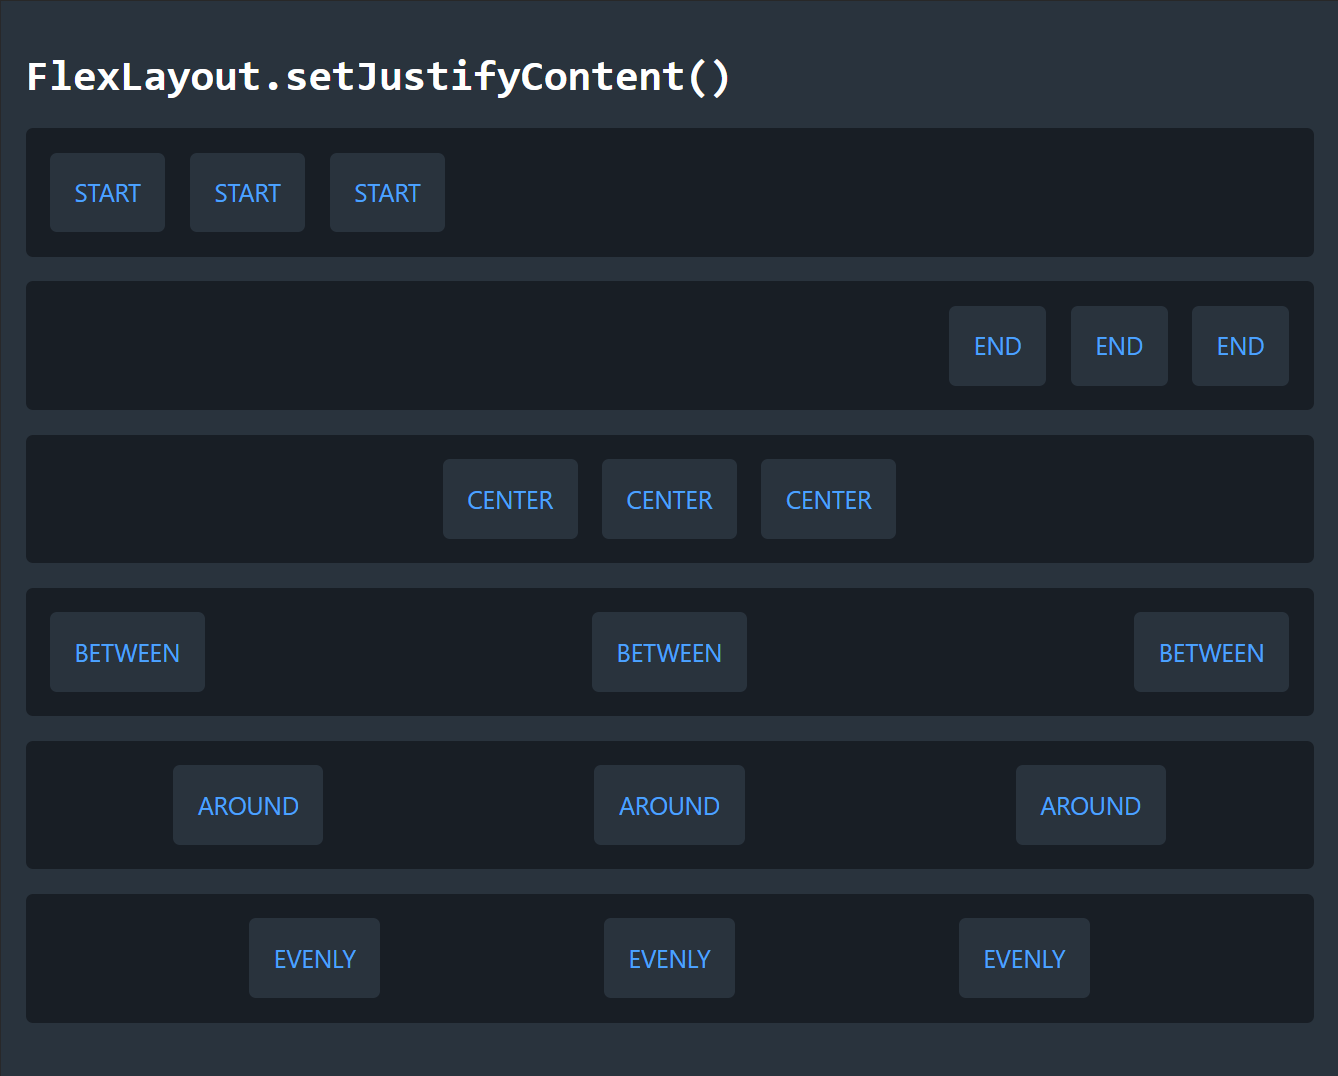
Main axis alignment with setJustifyContent()
You can control the alignment of items along the main axis with setJustifyContent(), which corresponds to the CSS property justify-content.
The image below shows all the possible values of the FlexJustifyContent enum in horizontal layouts.
Remember that in a column layout, setJustifyContent() controls the vertical alignment of items instead of the horizontal alignment.
The cross axis
The cross axis is perpendicular to the main axis, so it is either horizontal or vertical, whichever is the opposite of the direction set on the main axis. You can configure how individual items and multiple lines are positioned along the cross axis.
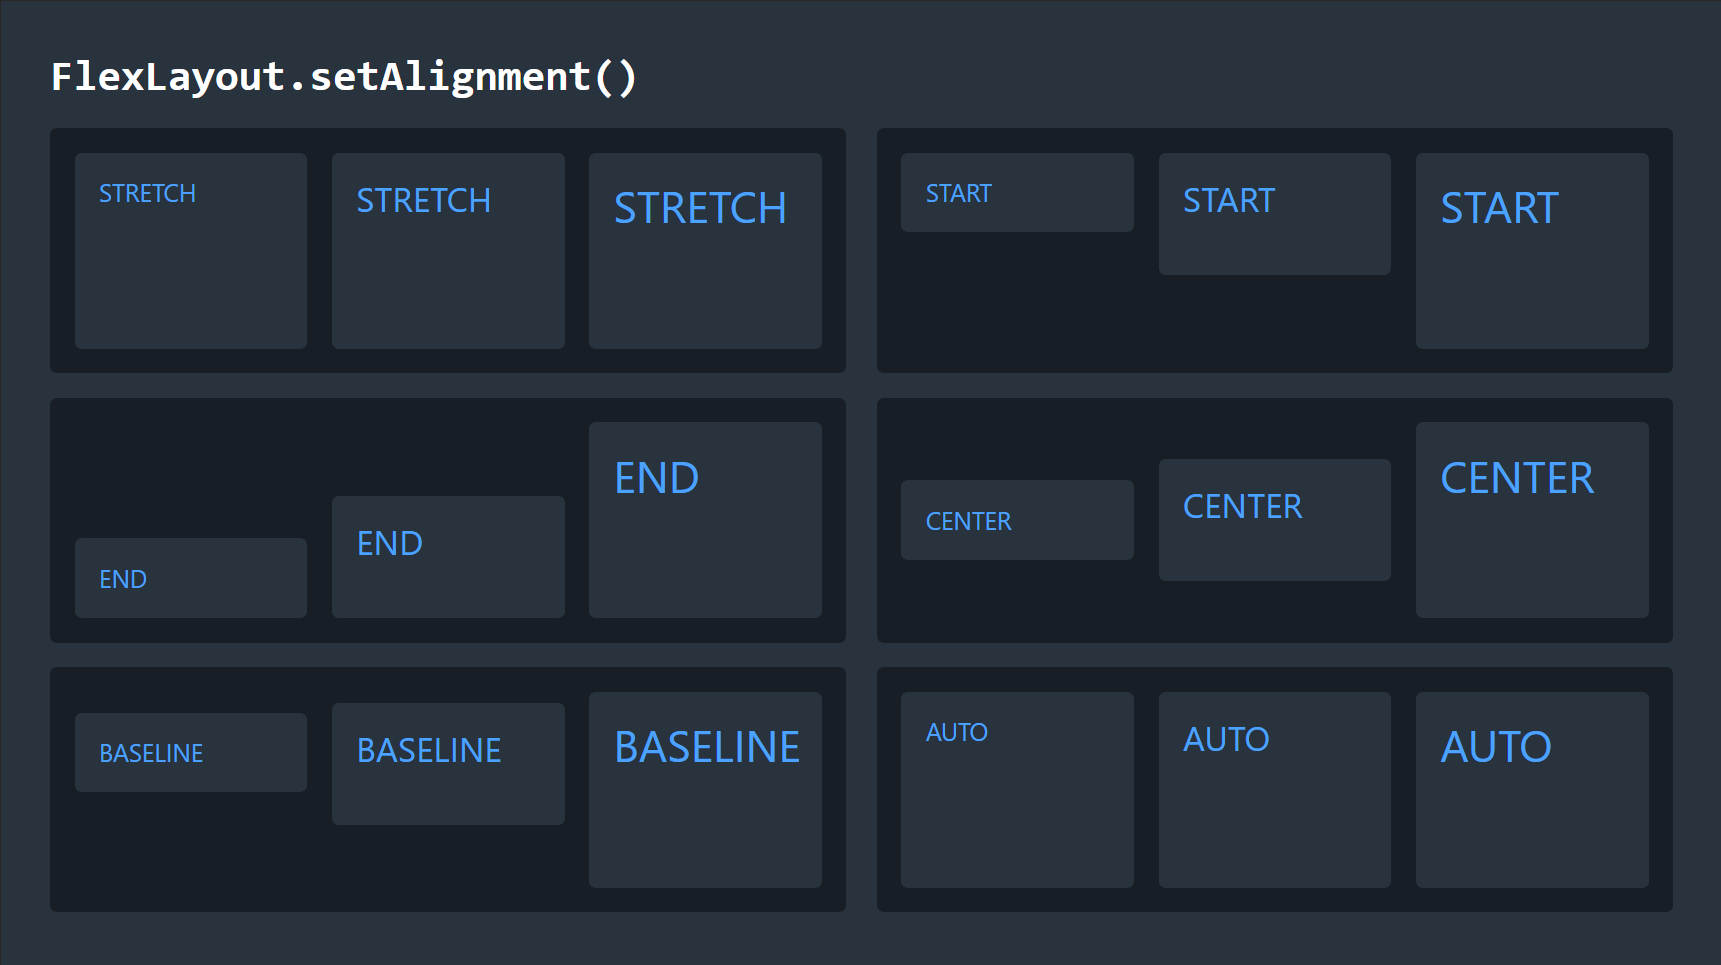
Cross axis alignment with setAlignment()
You can control how individual items are aligned along the cross axis with setAlignment(), which corresponds to the CSS property align-items.
The following image shows all the possible values of the FlexAlignment enum in horizontal layouts for items of varying sizes.
Notice how the BASELINE alignment depends on text size, because the items are aligned according to the text baseline.
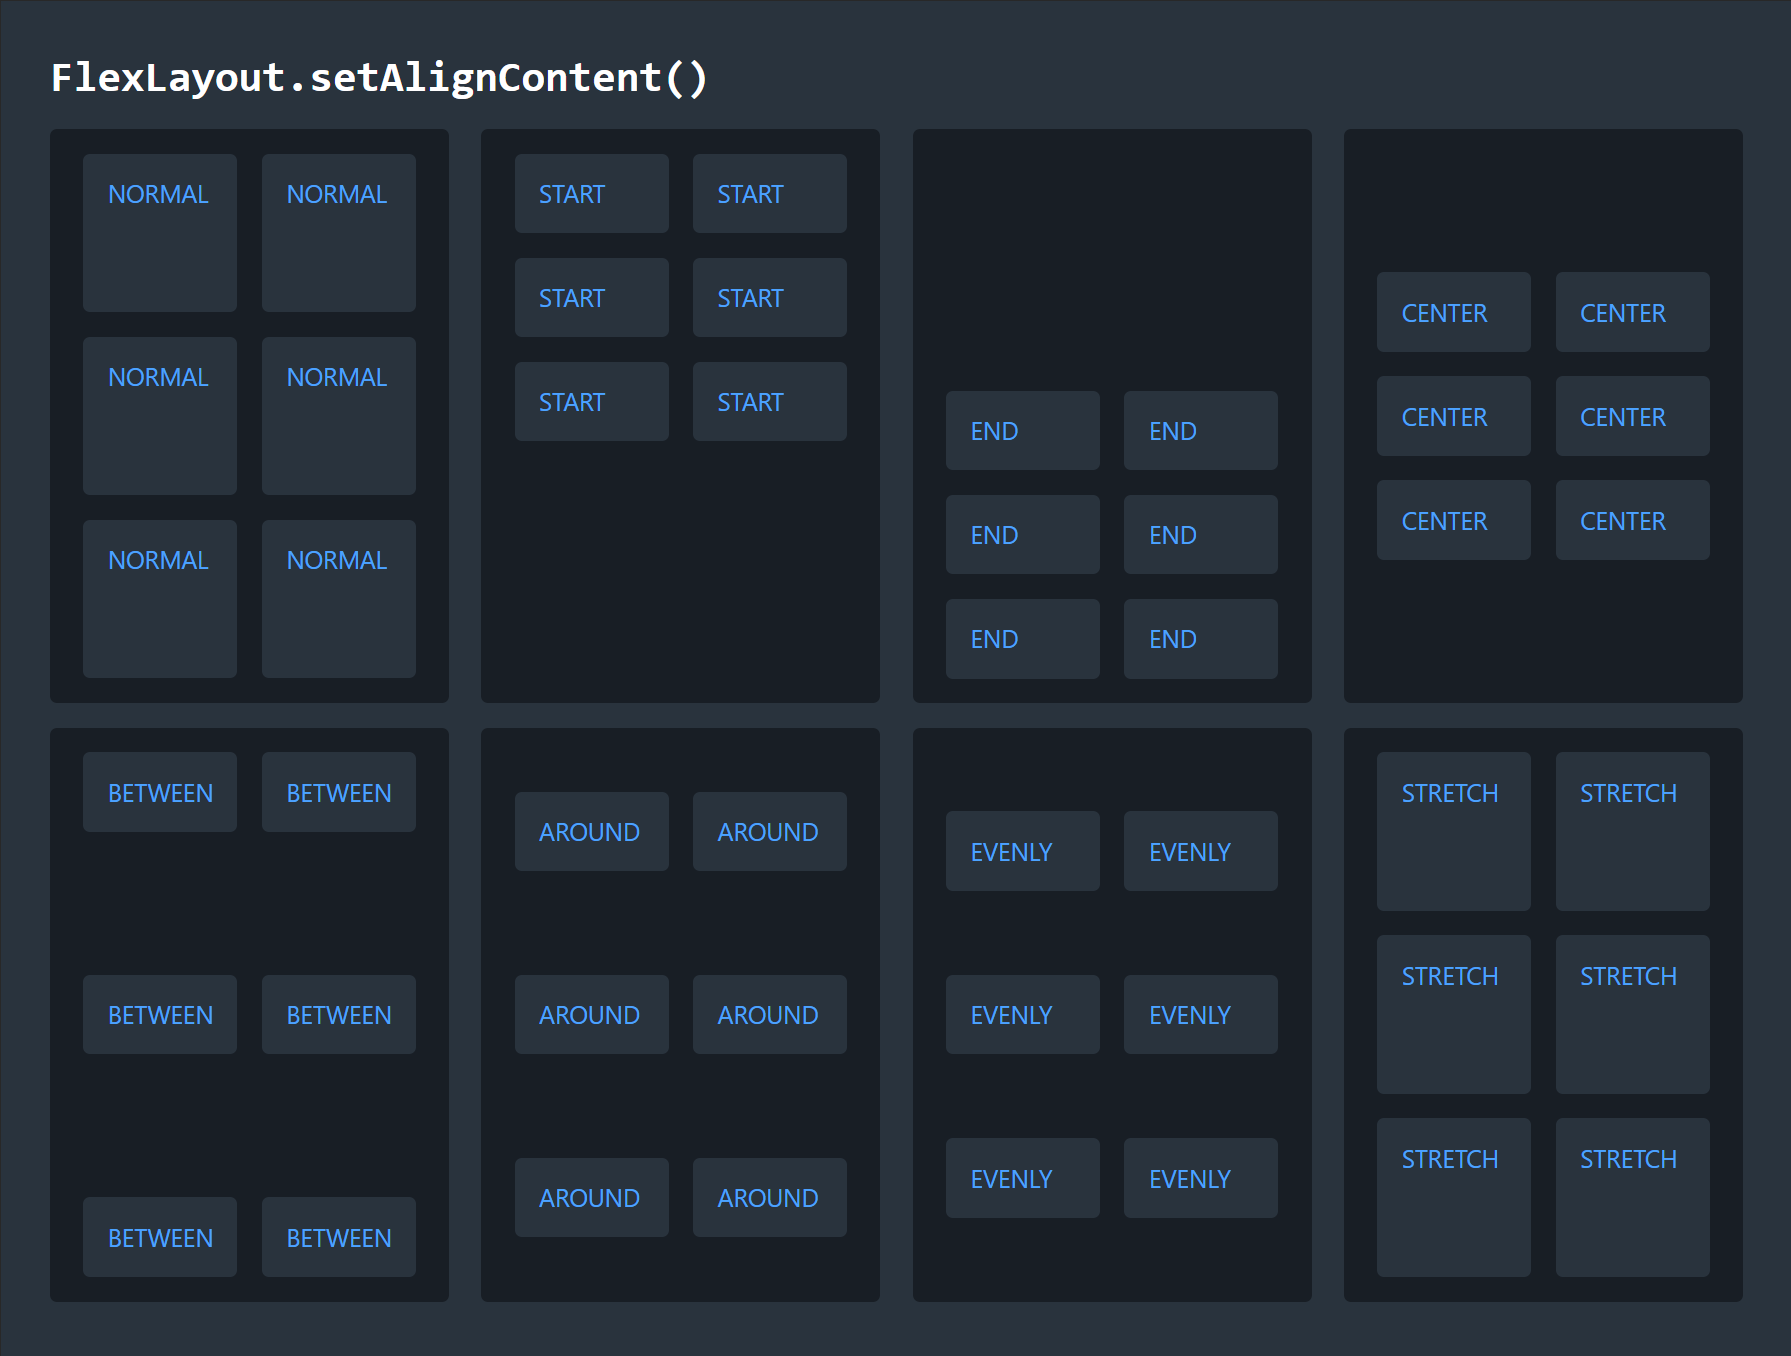
Line alignment with setAlignContent()
If wrapping is enabled, you may have multiple lines of content, each with their own main and cross axes.
To control the alignment of the lines of content, use setAlignContent(), which corresponds to the CSS property align-content.
In the image below, every value of the FlexContentAlignment enum is used to arrange three lines of items within horizontal layouts with wrapping enabled.
Summary
By using setDirection(), setWrap(), and setJustifyContent() on the main axis, and setAlignment() and setAlignContent() on the cross axis, you can exert a great deal of control over the placement of content in your app, while letting FlexLayout handle the complicated specifics of positioning and sizing automatically.
See the FlexLayout component page and the
FlexLayout
JavaDocs for full documentation of webforJ's FlexLayout component.
For a deeper dive into CSS Flexbox, check out the CSS Flexbox Layout Guide from CSS Tricks.